
GitHub Action基本介绍
文档
- GitHub Action官方文档(英文)
文档地址:https://docs.github.com/zh/actions/quickstart
- 阮一峰GitHub Action入门教程(中文)
文档地址:https://www.ruanyifeng.com/blog/2019/09/getting-started-with-github-actions.html
本网站使用Github Action一键部署,将其为例,以下介绍详细配置
部署案例
部署配置文件:
(本博客使用actions-gh-pages配置文件/任选其一即可)
在博客项目代码推送后一键部署并且创建gh-pages分支,无需手动创建gh-pages分支
- vitepress配置文件:https://vitepress.dev/guide/deploy#github-pages
十分不好用,不知道是不是我不会用的原因,但是个是对小白来说,该文档就只有最基础的配置
- actions-gh-pages配置文件(github开源项目):https://github.com/peaceiris/actions-gh-pages
在项目根目录创建deploy.yml部署文件
需要同步到git中,推送至代码仓库
# .github > workflows > deploy.yml
name: Deploy

on:
   push:
      branches:
         - master

jobs:
   deploy:
      runs-on: ubuntu-latest
      steps:
         - uses: actions/checkout@v3
           with:
              fetch-depth: 0
         - uses: actions/setup-node@v3
           with:
              node-version: 16
              cache: npm
         - run: npm install --frozen-lockfile

         - name: Build
           run: npm run docs:build

         - name: Deploy
            # 将构建产物 commit 到一个分支上,用于发布静态站点资源
            # https://github.com/peaceiris/actions-gh-pages
            #不要将peaceiris改为自己的仓库名,我单纯的以为这个需要改成自己的仓库名,部署上去就build失败了,需引用该仓库的配置
           uses: peaceiris/actions-gh-pages@v3
           with:
              # Github 会在 workflow 中自动生成 GIHUBT_TOKEN,用于认证 workflow 的运行
              github_token: ${{ secrets.GITHUB_TOKEN }}
              # 静态资源目录设置
              publish_dir: docs/.vitepress/dist
              # 默认发布到 gh-pages 分支上,可以指定特定的发布分支(不能选拉取代码的分支)
              publish_branch: gh-pages
              full_commit_message: ${{ github.event.head_commit.message }}
将博客项目推送至创建好的仓库
不需要像网上一样,创建
xxx.github.io设为仓库名,直接创建项目,会直接将仓库名设置为二级域名例如本博客,仓库名为
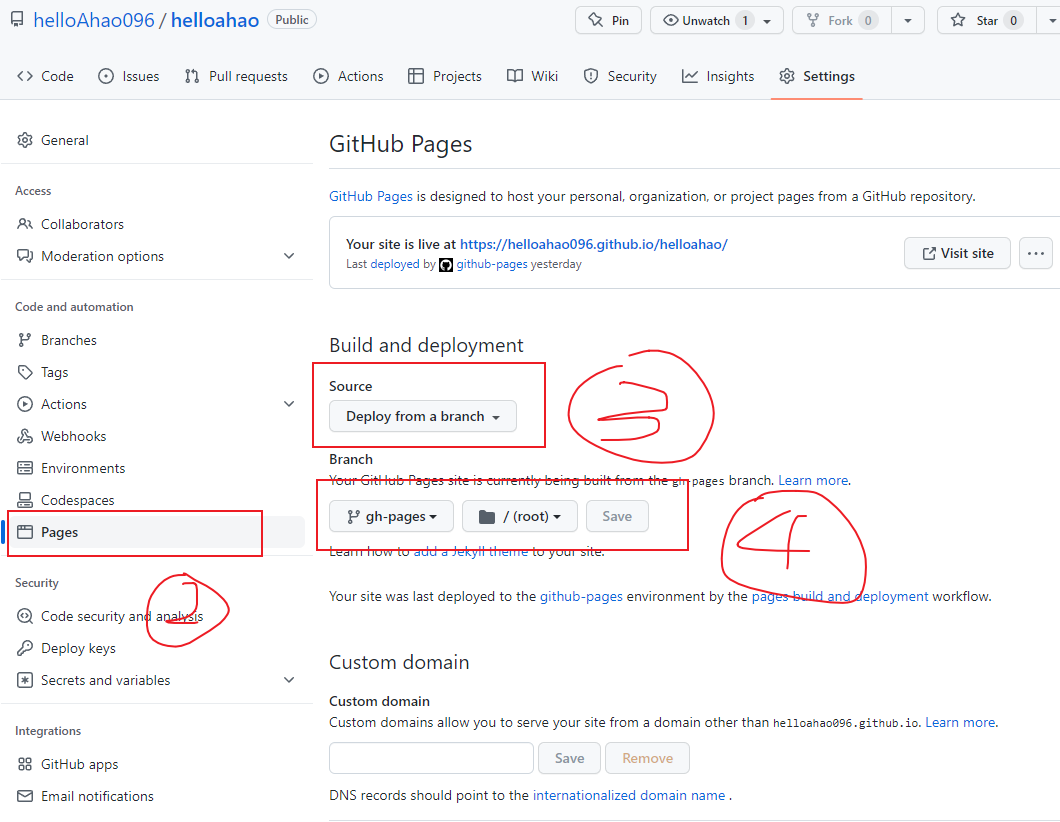
helloahao,则子域名自动生成为helloahao.github.io- 需要在repo setting中详细配置
- 选择代码仓库的Settings

- 选择pages
- 来源选择为一个分支
- 选择由action生成的gh-pages分支
踩坑总结
搭建博客全部踩坑经历,血泪史记录一下
Lock 文件记得上传到代码仓库,不然github action无法构建项目
根据使用的包管理器,需要上传对应的 lock 文件:
- 使用 npm:需要上传
package-lock.json - 使用 pnpm:需要上传
pnpm-lock.yaml - 使用 yarn:需要上传
yarn.lock
平时做项目的时候,只会关注
package.json,下意识的以为 lock 文件是不需要的,但是 github action 需要这个文件来确保依赖版本的一致性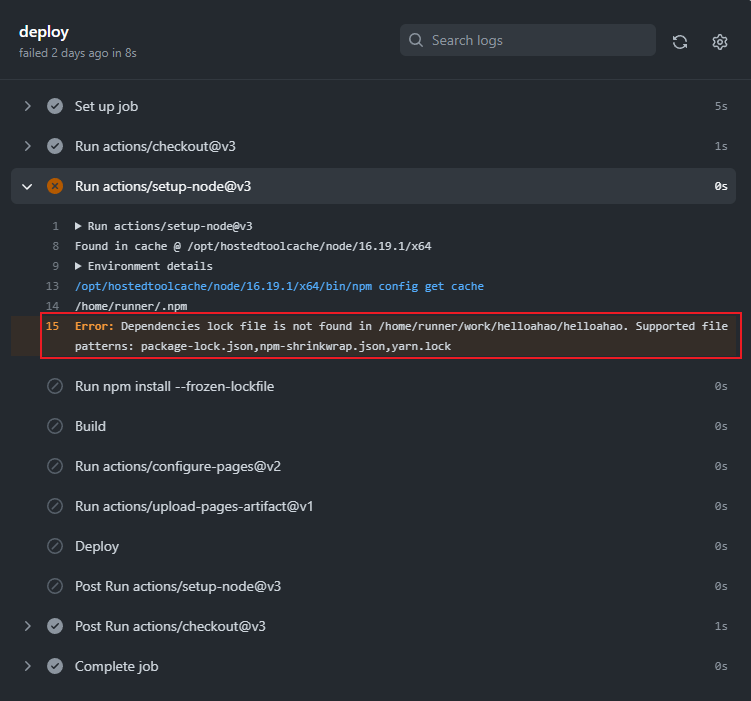
- 使用 npm:需要上传
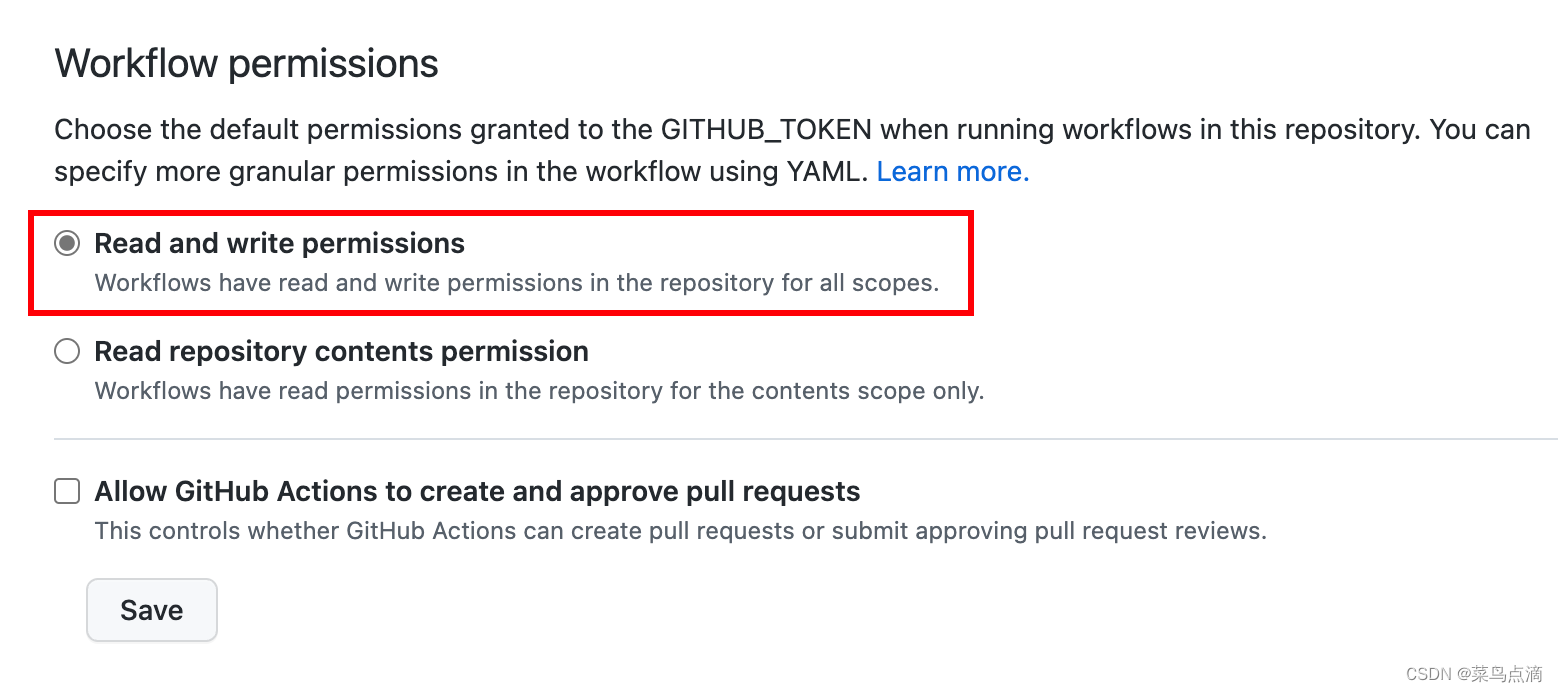
生成的gh-pages分支要开读写权限,不然生成的代码push不上去
参考:https://blog.csdn.net/weixin_42282187/article/details/124766382
Error: Action failed with "The process '/usr/bin/git' failed with exit code 128"
The requested URL returned error: 403
解决方案: 转到存储库Setting 选择Actions>>>General 在"工作流权限(Workflow permissions)"中,选择Read and write permissions
有的教程在deploy.yaml中写
npm run docs:build,不用run关键词,直接跑,我一开始还以为yaml的run字段会补全该功能,直接报错[error]Process completed with exit code 1.网上搜到的什么deploy.sh根本不好用,我尝试过配置shell脚本,完全不好用,github action直接一步到位,参考本博客即可